Some time ago I wrote a bit about how to download data from a Beurer BM65 blood pressure monitor to my PC via USB using a homemade Python module. That was good fun, so when I discovered the Contec CMS50D+ pulse oximeter (which also has USB connectivity) on everybody’s favorite online auctioning site for ~$40 including shipping, I had to buy one.
Contec CMS50D+
So, what’s in the box?
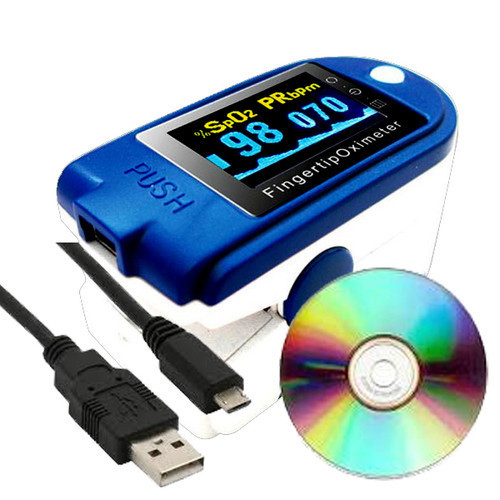
Apart from the device itself, the box contains a special USB cable (we’ll get back to this), a lanyard (because why not), no batteries, a small mysterious CD-ROM, and a surprisingly well-written English instruction manual. The device works as expected and outputs plausible data on it’s little display, which is very crisp by the way. I can’t vouch for the validity of the blood oxidation level, but the pulse stuff seems pretty precise at least. However, this is not the important part of this blog entry. Let’s focus on getting data off the damn thing without having to rely on the official software.

Contec CMS50D+ box content
Plugging it in
Others have already reverse engineered the protocol of this device, but let’s have a look at the bundled software anyway. After updating all the anti-malware software on my Windows box, I tried putting in the CD-ROM. So far it seems benign enough. It contains a single executable that installs a driver and two applications: one for live data display and one for downloading up to 24 hours of recorded data from the device. The software isn’t actually half bad, but as usual it’s unfortunately Windows-only. It runs in Wine, but sadly fails to connect to the device.
The bundled driver is for the Silicon Labs CP210x series of USB to UART converters, which simplifies things considerably. Now it’s just a matter of sniffing some serial traffic. In Linux, dmesg agrees with this when the device is plugged in:
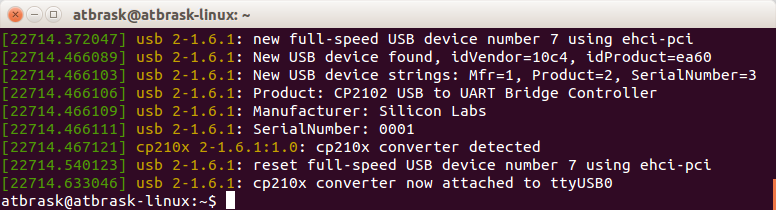
CP2102 detected!
Fun fact: The CP2102 chip is also detected if I only plug in the bundled USB cable and leave the pulse oximeter itself disconnected. Apparently this cable has a built-in USB to UART converter! That’s a bit weird considering the mini-USB plug at the other end… Even though the device itself sports a mini-USB connector, it’s not actually USB compliant and it won’t work at all with regular USB cables. So don’t throw away the special “USB cable”!
Let’s look at some real-time data
The device has two modes: real-time data and recorded data (up to 24 hours). The former streams data via the USB connection as it’s measured, while the latter is useful for situations where a running PC would be impractical. The real-time mode offers relatively rich 60Hz data while the historical mode only supports 1Hz averaged pulse and Spo2 readings. Coding-wise the real-time mode is the simplest as its protocol is one-way, so it’s a good place to start. I’ll cover the recorded data mode in another post.
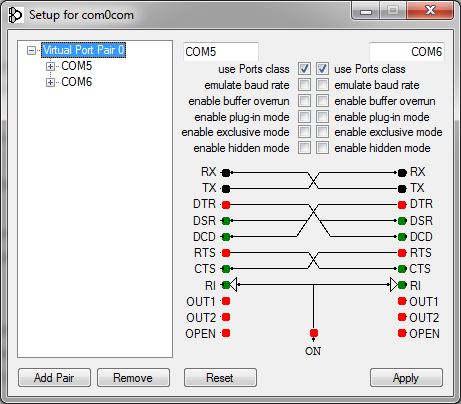
Anyway, I tried starting the live data application through API Monitor v2 like I did for the blood pressure monitor. Immediately when the live data application starts, it starts spamming the SetCommState API call in Kernel32.dll trying to open all available COM ports at 4800, 19200, and 115200 baud in quick succession. All three bitrates are configured as 8O1 (oddly enough). Perhaps this is in order to support several slightly different devices?
Another slightly odd thing is that the device is always transmitting data without any handshake. All the computer has to do is to open the right virtual serial port at 19200 baud 8O1. Yet another slightly odd thing is the protocol itself. Each data packet is 5 bytes long and according to some documentation found on the web, 60 packets are sent per second. The first byte always has its MSB set to 1 while the four others always have it set to 0. According to said documentation, the meaning of the 5 bytes are as follows (spelling errors and all):
| byte | bit | content |
|---|---|---|
| 1 | 0~3 | Signal strength for pulsate(0~8) |
| 4 | 1=searching too long,0=OK | |
| 5 | 1=dropping of SpO2,0=OK | |
| 6 | 1=beep flag | |
| 7 | Synchronization,always be 1 | |
| 2 | 0~6 | pulse waveform data |
| 7 | synchronization,always be 0 | |
| 3 | 0~3 | bar gragh (stand for pulsate case) |
| 4 | 1=probe error,0=OK | |
| 5 | 1=searching,0=OK | |
| 6 | bit 7 for Pulse Rate | |
| 7 | synchronization,always be 0 | |
| 4 | 0~6 | bit 0~bit 6 for Pulse Rate |
| 7 | synchronization,always be 0 | |
| 5 | 0~6 | bit 0~bit 6 for SpO2 |
| 7 | synchronization,always be 0 |
I think this information is for a slightly different model (hence the 4800 baud setting instead of my device’s 19200 baud), but it seems legit. In any case, I have yet to see data that doesn’t make sense according to this table.
Like last time, I have implemented a small python script that is able to connect to the device. It takes a few command line arguments and outputs a CSV file with the received data.
All code for this project can be found on GitHub.
Next up: Retrieving historical data for the last 24 hours… Stay tuned…