In this post, I’m going to discuss a simple bitmap vectorization algorithm that’s compatible with TrueType. The goal is to convert a C64 character set to a usable TrueType font.
Most technical details about TrueType and character mapping (i.e. C64 character sets vs. PETSCII vs. ASCII vs. Unicode) can wait for the upcoming blog posts. However, there are already a few facts about C64 characters and TrueType we do have to keep in mind. These are:
- Each C64 character glyph is 8×8 pixels, monochromatic, and monospaced. Because they are monospaced, we don’t have to concern ourselves with issues like kerning.
- TrueType only has limited support for bitmap fonts. Therefore, we need to vectorize the 8×8 bitmaps. No need for fancy bezier curves. Just crisp retro-looking blocks with 90-degree corners.
- A TrueType-style glyph in its most basic form (without hinting) consists of a set of contours, and a contour consists of a set of points. Points in opaque contours are specified in clock-wise order and points in transparent contours (e.g. the “hole” in the letter O) are specified in counter-clockwise order.
- Some letters go a bit below the baseline. The vertical range above the baseline is called the ascent and the range below is called the descent. Most C64 character sets seem to have an ascent of 7 pixels and a descent of 1 pixel.
- Coordinates in a TrueType glyph are normally scaled such that the glyph will fit inside a 2048×2048 box. If the font has a non-zero descent specified, the Y-coordinate will be negative below the baseline. Assume a typical 8×8 pixel C64 character with a 1 pixel descent. In TrueType-terms each pixel would then be 256 units by 256 units, the lower left corner would be at (0, -256), and the upper right corner would be at (2048, 1792).
- A contour should consist of as few points as possible in order to reduce complexity. Consecutive points along an axis can be simplified to include only the endpoints without any differences in the rendering of the glyph. Also, the last edge in a contour is implicit. The renderer will simply assume a direct line from the last point back to the first.
This ought to be enough for now. Let’s now try to convert the default C64 ‘A’-glyph to a TrueType-compatible vectorized form. In ASCII ‘A’ is char #65, but on a C64 in upper-case mode the character set is laid out as follows. In this mode there are 128 characters in both their regular form as well as an reverse video version:

Dump of C64 character data (upper-case mode)
Each character consists of 8 bytes that each describe a row of 8 bits. The top left pixel of a given character is the most significant bit in the first byte and the bottom right pixel is the least significant bit in the 8th byte. Let’s look at the first 24 bytes of this data:
0x3C, 0x66, 0x6E, 0x6E, 0x60, 0x62, 0x3C, 0x00, 0x18, 0x3C, 0x66, 0x7E, 0x66, 0x66, 0x66, 0x00, 0x7C, 0x66, 0x66, 0x7C, 0x66, 0x66, 0x7C, 0x00
We are interested in the second character, which is at bytes 0x08…0x0F. If we try to show these as binary with one number per line, we get something like this:
0x08: 0x18 = 0b00011000
0x09: 0x3C = 0b00111100
0x0A: 0x66 = 0b01100110
0x0B: 0x7E = 0b01111110
0x0C: 0x66 = 0b01100110
0x0D: 0x66 = 0b01100110
0x0E: 0x66 = 0b01100110
0x0F: 0x00 = 0b00000000
Or, a bit more clear like this:
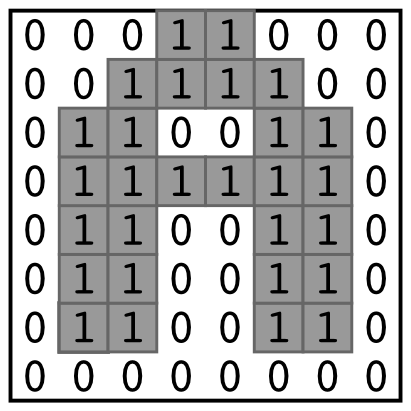
The letter ‘A’ on a C64.
This looks like the letter ‘A’. Notice that it doesn’t go below the baseline (i.e. the lower-most row consists entirely of zeroes). But how do we make this into some nice vector contours? An easy way to vectorize a bitmap like this is to simply draw a clockwise box around each opaque pixel. This, however, is very wasteful:

Naive vectorization
We are already getting close. Notice how all edges on the outside are going in a clockwise direction around the letter, and how the edges in the “hole” are going counter-clockwise. This is exactly what we want. But we only want edges on the boundary of the contours. In the picture above we have 28 opaque pixels with 4 edges each, resulting in 112 edges in total. That’s a bit too much. Let’s change the algorithm to skip all edges where the adjacent pixel is opaque. Then it looks something like this:
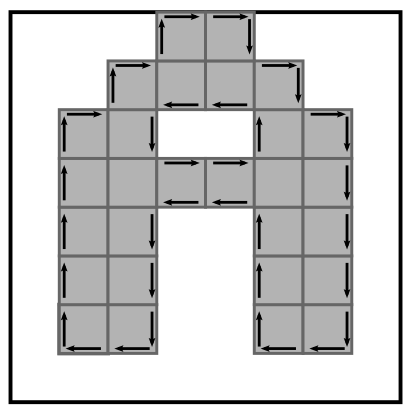
Unncessary edges removed (well, most of them..)
Now we are down to 38 edges. But we can do better. Quite a few edges are consecutive along an axis. These can be merged to yield simpler contours.
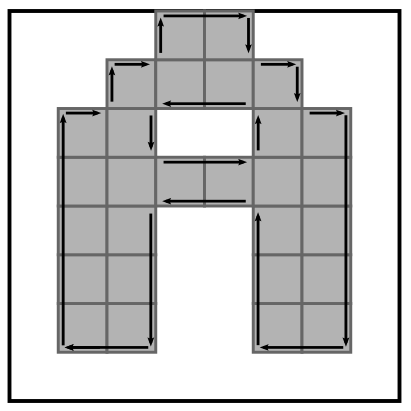
Almost there…
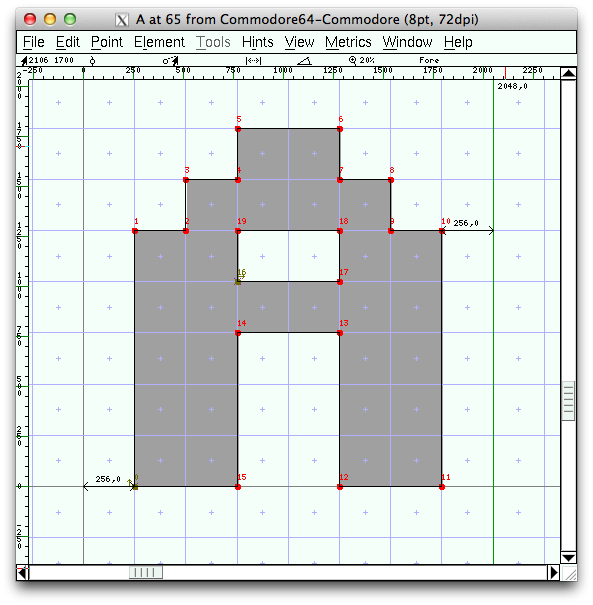
Now we are down to 20 edges with 16 in the outer clockwise contour and 4 in the inner counter-clockwise contour. Now we only have to scale the coordinates of the edges to fit a TrueType glyph. Remember that everything is supposed to fit within 2048×2048 units, giving a pixel size of 256×256. Then we are done:
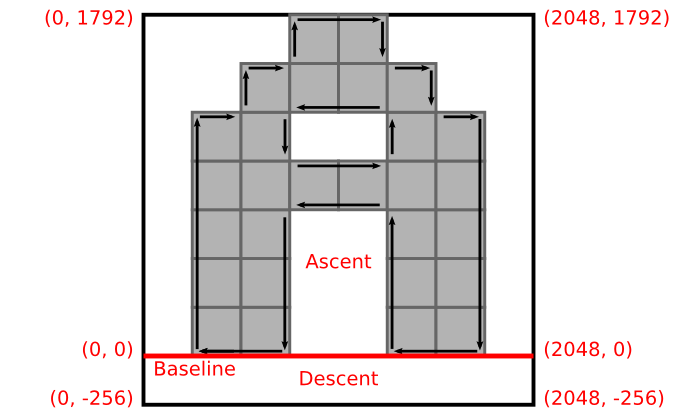
Vectorization done!
In the TTX format of FontTools, this would look something like the following:
<TTGlyph name="A" xMin="256" yMin="0" xMax="1792" yMax="1792">
  <contour>
    <pt x="256" y="0" on="1"/>
    <pt x="256" y="1280" on="1"/>
    <pt x="512" y="1280" on="1"/>
    <pt x="512" y="1536" on="1"/>
    <pt x="768" y="1536" on="1"/>
    <pt x="768" y="1792" on="1"/>
    <pt x="1280" y="1792" on="1"/>
    <pt x="1280" y="1536" on="1"/>
    <pt x="1536" y="1536" on="1"/>
    <pt x="1536" y="1280" on="1"/>
    <pt x="1792" y="1280" on="1"/>
    <pt x="1792" y="0" on="1"/>
    <pt x="1280" y="0" on="1"/>
    <pt x="1280" y="768" on="1"/>
    <pt x="768" y="768" on="1"/>
    <pt x="768" y="0" on="1"/>
  </contour>
  <contour>
    <pt x="768" y="1024" on="1"/>
    <pt x="1280" y="1024" on="1"/>
    <pt x="1280" y="1280" on="1"/>
    <pt x="768" y="1280" on="1"/>
  </contour>
  <instructions><assembly>
    </assembly></instructions>
</TTGlyph>
Finally, let me give you a sneak peek of what this character looks like in the TrueType font editor FontForge:
Please have a look at the complete C64 to TTF python script if you want to know more about this. It can be found at my GitHub account.
Next time, I’ll talk a bit about how to map all the characters from the native C64 format into PETSCII, ASCII, and Unicode.
3 Comments
svat · 2016-10-18 at 20:25
Very nice post, thank you! And a cool trick for converting the bitmap into an outline: it’s beautiful how, starting with the clever idea of “simply draw a clockwise box around each opaque pixel”, the refinements like “canceling” adjacent opposite edges and “extending” consecutive ones just seem so natural (at least in hindsight, with your illustration).
Do you have samples of the ttf fonts you created this way? I wonder how these fonts appear when used (especially curious what happens at low resolutions, like trying to display this 8 px font at 11 px).
atbrask · 2016-10-18 at 23:23
Thanks!
As an example I have created a sample font file from the default C64 char bitmaps. I used the example command described in the README-file in my c64ttf GitHub repository.
http://www.atbrask.dk/stuff/c64.ttf
APRILIA KINANTHY · 2019-07-12 at 12:30
ohh nice, can i share it ?